
What’s even more surprising is to find out how many of these people have never performed maintenance on their own server either (if they have one), even though their server should be treated like your brand new car: follow the manual to the letter when it comes to maintenance. Lack of maintenance is pretty much the number one reason for performance degradation for servers and workstations alike. So in the interest of getting a few less phone calls, I’ve made up a general list of maintenance items that should be done against every computer at least once a month:
1. Keep the computer clean, inside and out:
Do you know what the dirtiest object people put their hands on is? You guessed it; your keyboard! The outside of your computer is probably one of the filthiest surfaces in your home or office, so make sure to clean it with a damp cloth on the outside of the tower and monitor. For the front of the monitor, I prefer to use a quality eyeglass lens cleaner, as eyeglass cleaners have been formulated to be very gentle on UV and Anti-Reflective coatings. For the keyboard, disconnect the keyboard from the tower, then use a container of “Canned-air” to blow out between the keys, then take a damp cloth and gently wipe the keyboard overall, not pressing too hard (you don’t want to break they keys!).
And don’t forget about the inside of the computer. People generally are shocked to see how much dust and dirt collects inside a computer tower, but really, should you be? On the tower, there’s a least one large ventilated area at the back, and behind it sits a fan that sucks air in. But there’s no filter, so if the air is dirty, that dirt will get sucked in to the machine, the same way the dirt gets sucked into your mouth when you breathe. Only difference is, your computer can’t cough.
To clean out the dirt, you need to take disconnect all the peripherals (keyboard, mouse, printer) from your computer, unplug it, and remove the side-panel cover.
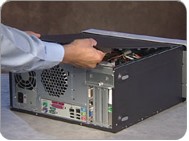
Next, set the tower on to its bottom panel, and tilt the open side down about 45 degrees.
Next, using canned air, gently blow on the internal components, starting from the top and working your way down. You’ll get a lot of dust kicking out the first time you do this, so you may want to do it outside.

Once you’ve sprayed out all the dust, replace the side panel (don’t forget to put in the screws at the back if there were any), put the tower back where it was, and reconnect all ther peripherals.
2. Clean the hard disk(s)
Now that you’ve done the physical clean up of the machine, let’s clean the hard disk(s), which contain the actual files and data you use on a daily basis. We’re going to assume that you’re working with a Microsoft Windows operating system (which is a fair assumption, given current Operating System usage statistics), so following the next steps:
a. Navigate to the hard disk to be cleaned. This can usual be found by doule-clicking “My Computer”, and then the system displays all the internal disks, flash drives, and optical disk drives.
b. Right click the disk to be cleaned and select “Properties”. You’ll see a screen similar to the following:
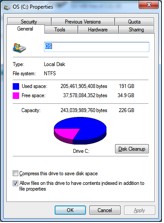
c. Click “Disk cleanup. After telling you to wait a few minutes while it calculates, the system will then present you with a number of recommendations to clean the disk.
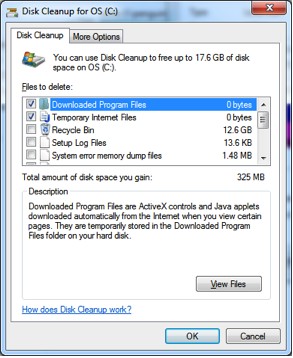
You can usually safely empty: Downloaded Program Files, Temporary Internet files, Setup Log Files, System error memory dump files, Temporary files, Thumbnails, and anything else they recommend with the exception of “Compress files to save disk space”. DO NOT ALLOW THE SYSTEM TO COMPRESS FILES TO SAVE DISK SPACE! Why you may ask? It’s a long story, but given that we’re trying to improve the performance of your computer, giving the operating system another thing to do when retrieving files (such as decompressing files) is counter-productive.
d. Click “OK”. The System will then remove all the unwanted file from your disk, allowing for faster disk read and writes!
3. Defragment your disk
Now that you’ve cleaned up your disk, we should defragment it. What’s defragmenting, you ask, given that it sounds like a military maneuver involving explosives? Here’s the quick run-down. When your operating system is working, it’s moving files from here to there and back to here on the hard disk(s). Also, when you install or uninstall an application, it does the same thing (moving files all over the place). After awhile, this leaves areas of your hard disk empty, and files that should be next to each other actually left all over the place, so when your operating system is looking for a file, the hard disk has to read all over the disk, rather than in just one spot. This is called fragmentation of files. Luckily, there are many tools to fix fragmentation. These are called Defragmentation Tools. Windows machines come with their own, so follow these steps.
a. Perform steps “a” and “b” of the “Disk Cleanup” process.
b. Select the “Tools” tab at the top. You’re presented with the following screen:

c. Click the “Defragment now” button. You’ll see something similar to this:
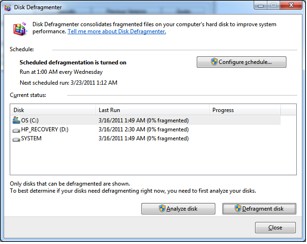
d. Select the disk you’d like to defragment and click “Defragement Disk”. At this point, depending on your version of Windows, it will either give you a visual representation of the deframentation process, or display a percentage “%” under the progress column.
e. Once it’s completed defragmenting the selected disk, the system will indicate that the process is complete. You then close the windows and, if necessary, restart your computer.
These are the basic steps to maintaining your computer, and ensure it lives a long healthy life. Also, if you maintain your computer properly, you may find that it performs better than newer computers, if only due to the fact that your machine may not be running a larger, bulkier operating system. There’s a common misnomer that computers slow down as they get older, which logically doesn’t make sense, given a computer is really just a series of circuit boards, with the disk drives and the fans containing most of the moving parts. The real reason they get slower is due to neglect and lack of maintenance (and with the occasional bad piece of software). Follow the before mentioned steps, and your computer will last for many years to come.
Here’s a few other tips to keeping your computer in tip-top shape:
- Ensure that your anti-virus software is up to date.
- Routinely go through your list of installed programs and remove what you don’t need or use anymore. Don’t forget to defragment the disk when you’re done, so that your files stay in the correct order for quick retrieval.
- Avoid “Bloatware”. “Bloatware” is software that is way too big for what it’s doing. If you have an application that uses in excess of 2% of your CPU or memory resources on a consistent basis, remove it! It’s “Bloatware”.
- Don’t install everything that you’re prompted to. Ever go to web sites and a window comes up, asking if you want to install something? My default answer is to say “No”, because it’s usually a bad piece of software. Try to avoid these kinds of software.
No comments:
Post a Comment